Advanced Tin Snips & Aviation Snips
Let’s face it, it’s fun to own power tools They make quick work of any project and who doesn’t like quick work? But they’re also a huge budget-killer, and most of the time, they’re unnecessary. We feel that’s the case with cutting metal panels. If you were installing metal roofing for a trade, you would have a set of power tools designed to get the job done fast and easily. However, DIY’ers will generally want to use basic tools – an not have to invest big money in tools that may get used for only a single project.
With that, while installing your new metal roofing a set of tin snips will do you. Most of our DIY customers successfully use them. They can easily cut through 26 or 29 gauge metal panels, and probably heavier. But there is a RIGHT way to do it!
We highly recommend reading this article and watching the videos before you start snipping away at your new metal roof panels. It’ll make the job much better for you!
Tin Snips 101 – What Are Tin Snips?
Tin snips function like scissors for cutting metal panels. They look like, say, gardening shears, but they’re intended to cut varying gauges of aluminum, steel, tin and even vinyl siding. There are many kinds of tin snips, like “aviation snips,” that are named after their importance in the manufacturing of planes and other aircraft.
Like anything, you get what you pay for, and if you’d like your tin snips to last, invest in hardened steel so the blades keep cutting for the long haul.
Tin Snips, Aviation Snips, and Compound Snips
Tin snips, standard issue, have a single point of pivot. They’re workhorses and get the job done, but you’ll work harder with them. They resemble a large pair of safety scissors, except with roomy handles meant for gloved hands. That single pivot and less complicated construction means they can last decades if kept sharp. They have two blade types, the normal blade and the duckbill.
- The duckbill-bladed tin snip is better for cutting in tighter curves, but the tapered design of the blade makes it less robust for cutting thicker-gauged sheets.
- The normal blade or straight pattern blade is best for making long, straight cuts.
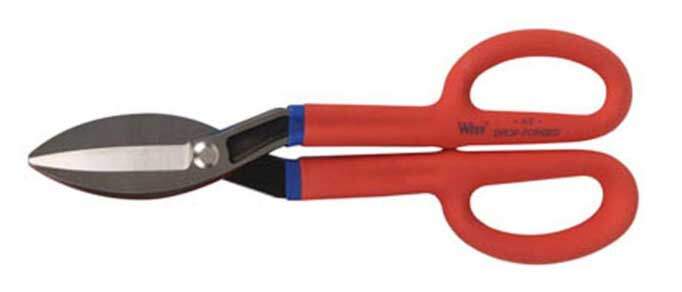
Standard straight pattern tin snips.
Aviation sips are made with a double pivot and are spring-loaded, with a safety lock on them. The double-pivot with spring-loading means it’s easier to use over the course of a long day. The gauge-appropriateness depends on the snips in question, so check their rating before purchasing. Aviation snips are often sold in sets of three, with each snip being designed for a different cutting purpose, which we’ll explain in the next section.
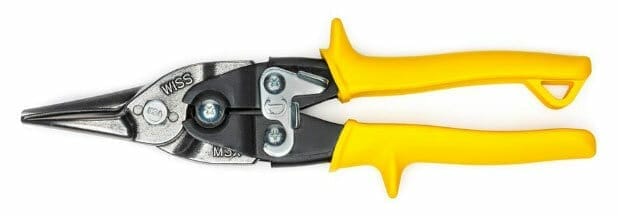
Aviation snips. Straight cut version shown.
Compound snips have added leverage in them, making them well-suited to heavier-gauge metals, particularly things like ducts and seams.

Compound aviation snips. Designed to cut 18-gauge cold-rolled or 23-gauge stainless steel
Color-Coding on Aviation Snips
Color-coded aviation snips are helpful. They come with red, yellow, and green handles, or a strip of each of these colors on the handles, and sometimes there are white snips too. It’s important to understand what the colors mean and to use the right one for the right job. As ambidextrous tools, they are intended for both right- and left-handed people, but each one only works for the direction they’ve been designed, because that’s how the blade moves.
That’s actually a key misunderstanding, though, that color-coding is for what direction the cut is… in truth, it’s more about where the off-cut goes! It is not so much about what “side” or “hand” but it’s more about what side the off cut (scrap) will be going.
- Yellow: While yellow snips are commonly used for cutting long, straight cuts, this isn’t ideal. They’ll distort more than using a red or green snip would for long cuts. Yellow snips are better when cutting notches. They can also do wide curves. (A bonus is, if plastic clamshell packaging on new purchases makes you nuts, these guys will get it open quickly for you.)
- Green: Ideal for right-handers cutting duct, as well as straight and right/clockwise cuts.
- Green is good for making right leaning cuts.
- The off cut (scrap) will be on the right side of the cut.
- Red: These cut best straight and are good for left/counter-clockwise snipping.
- Red is good for making left leaning cuts
- The off cut will be on the left side of the cut.
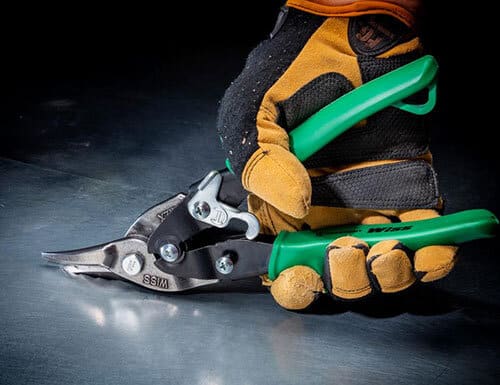
Green aviation snips cutting a right-leaning curved cut.
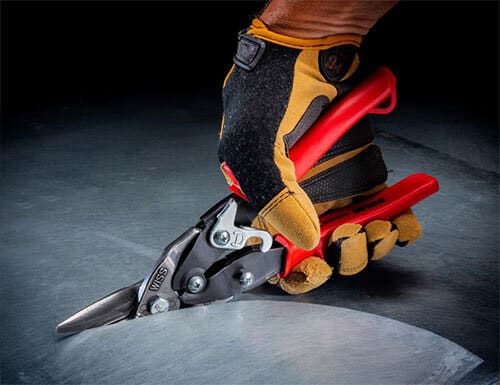
Red aviation snips cutting a left-leaning curved cut.
But, with red and green snips, whatever side the jaw is (the bowed-out wider part of the shears on the bottom), that’s the side where the off-cut metal will curl up as you cut. Snip choice makes a big difference in how flat your metal remains after trimming it. Always cut so the jaw is facing the off-cut or waste side of the material – always!
White handles or a white strip can indicate a seaming or crimping tool.
Left-Handed vs Right-Handed Aviation Snips
A common misconception is that red or green indicates what snips to use for right- or left-hand-dominant people. Nope!
The truth is, the snips work for either hand as they can be used with the shear at the bottom or the top, so the same snips can be used right-side-up for one side of a curve and upside-down for the other side of a curve.
It takes some getting used to, but you’ll figure out what works best for you. To get a grasp of what snip cuts which way, practice on scrap metal for a bit. For instance, as a righty, you may find it easier using green snips for many cuts. A lefty can make the same cut from the opposite direction with red snips.
As an exercise to demonstrate this either-way ability with tin snips, try making some practice curve cuts with, say, the green snips. Cut a small curve off the corner of a scrap sheet. Follow the natural curve of the snips while you cut. Now, flip the same pair of snips over in your hand and cut a curve off the opposite corner. You should have a mirror-image cut on both corners. This is the beauty of aviation snips and how they’re essentially a reversible tool. So why do you need a red and green one? You don’t, but it’s handy in terms of controlling the off-cuts or waste cuts better throughout projects.
What’s Better, Straight Tin Snips or Offset Snips?
Straight tin snips can do some curved cutting, but what makes it handy to have slightly offset snips around is that the offset handle means your hands are above the cut, not in line with it, and so it’s easier to do long, straight cuts. And “easier” means an added touch of safety when working with sharp metal edges.
And narrower blades on yellow straight snips make them good for cutting tighter curves. A 90-degree offset handle can be great to have for tight spaces or if you need to cut upside-down.
Whatever snips you buy, buy high-quality. It’ll be worth it when your metal isn’t getting jammed or twisting between blades.
In a perfect world, your kit would have a set of red, yellow, and green aviation snips, a compound snip, and an off-set snip. That way, you’re good to go for nearly any cutting dilemma.
Serrated Blades vs. Smooth Blades on Tin Snips
A serrated blade can be great for gripping metal or even having a non-slip ability when cutting a few layers of metal hems. They can even make easier work of cutting through thicker sheets.
But those tiny ridges can compromise natural metals like aluminum, copper and zinc years in the future, because they can slowly fray or tear. When working with natural metals, it may be wise to avoid serration. If you’re not sure about the blade for your project, feel free to call our customer service line for some advice.
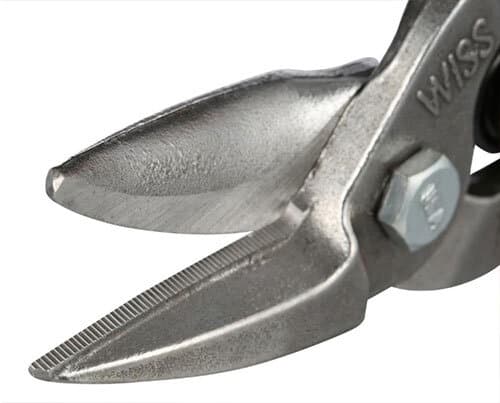
Serrated tip
Metal-Snipping Techniques and Tips
Right-side up.
Always have the snips blades perpendicular to the metal sheet you are cutting. The metal must feed straight in, and the blades must cut straight down. This is true of off-set snips as well; it doesn’t matter where the handles point, it matters that the blades are perpendicular to the cut, otherwise the metal will catch in the blades and you’ll damage the metal… and maybe your snips too.
Consistency matters.
When cutting with tin snips, one reason aviation snips are so popular is that the spring-loading makes things easier, yes, but it also makes fluid cuts. Having steady, consistent cuts will make your lines smoother and straighter, or properly curved. Sharp blades are important for this too. If you’re straining to make cuts, it’ll result in chunks or curves in the metal, which isn’t ideal.
Shorter cuts are better.
Similarly, use small, frequent cuts versus larger longer cuts. Snips are designed to cut about 1/4″ of material at a time. This lets the off cut roll up as intended, and improves the quality of the cut edge. The larger cuts are more likely to produce a jagged edge. Avoid cutting with the full length of the blade, as it can create a dimpling effect.
Use the best snip.
Don’t get stuck using just one pair during a cutting job; sometimes alternating between red and green can mean removing a strip much easier than doing just a long cut. This is a great video to watch for some technique ideas.
Alternate between snips for straighter long cuts.
While you can cut down the middle of a large sheet of metal, aviation snips are best for narrow strip removal. To compensate for how metal may curve or bend, cut a strip out where you use red snips for one side and green snips on the other, cutting 2 inches at a time on alternating sides – so, two inches up the right side, two inches up the left. This controls how the metal flexes and gets a cleaner cut. It’s painstaking, but you’ll have a better-quality finish. This video is quite helpful.
Make rough cuts and finishing cuts.
Say you’re cutting a long 30” piece of flashing in half. Instead of trying to get a perfect cut on the first try, it may be better to cut ½” away from the point where you actually want the proper cut. This rough cut then can be easily cleaned up by a second, easier pass with your tin snips. Make sure the second pass is done with the lower jaw facing out toward wherever the off-cut will be, so the waste side curls up, and the working side of the metal doesn’t bend.
Don’t strain on heavy metals.
When cutting seams and thick metal, use compound snips. Cutting metal rated too thick for your blades will damage both the tool and your metal. Longer tin snips and compound snips are best for heavy corrugated metal.
Metal is forgiving.
When you’re covering your cuts with flashing and such, it’s NOT NECESSARY to sweat for a pretty cut line. Just avoid having it be really jagged so it doesn’t start fraying in a decade or two. Rough edges happen – that’s what trim is for!
Practice Makes Perfect
It can be tricky to get the hand of using tin snips. In the end, the important thing is to make sure you’ve got a sturdy, strong pair of snips graded to the metal thickness you’re working with. It’s better to cut in short, consistent strokes.
Of course, practice is what it’s all about. Before you start cutting the “real” material for your job, try doing some practice cuts. Then, when you’re really getting into your work, make rough cuts a half-inch or so away from where you want the real cut to be, before cleaning it up with another pass.
Before long, you’ll feel comfortable and in control of your cuts.
And Don’t Forget the Gloves
Using heavy gloves, like thick leather, when cutting metal is wise, as the edges can be dangerously sharp. Work safely and you’ll get through unscathed.
Need More?
Please visit our metal roofing DIY library for more articles.


