Typical roofing construction will last somewhere between 5 and 20 years. This includes roof coverings such as shingles, slate, or wood shake shingles. Metal roofing offers an excellent option for replacing these standard roofing materials at the end of their lifespans. Before considering this option however, one must first research their local zoning and code restrictions relative to roofing options. In actuality, some neighborhoods or new residential developments may have restrictions or specific guidelines for the use of roofing materials. To save on time and costs, it is important to educate oneself before getting started.
The Slate or Wood Shake Roof
When replacing a slate roof, the old roof should first completely be removed. This will help to alleviate the problem of having too much weight on the roof. Additionally, wood shakes are often uneven and thus may also provide an unacceptable surface on which to lay your new metal roof.
Note: Under many circumstances, it is possible to install a new metal roof over the top of existing asphalt shingles – even if there are two layers of asphalt shingles. However, it is important that you know the weight capacity of your roof and how many layers of shingles are currently on the roof. If going this route, make sure your roof deck is in good shape. If you have had leaks it is quite possible that the decking of your roof (or some of it) needs to be replaced. If this is the case, you will have to remove the old shingles.
Installing a Metal Roof
Make sure your roof decking is in good shape. This is most easily done by getting into the attic and seeing if there are any water damages sheets of decking. Be sure to inspect it thoroughly and repair any problems according to your local building codes.
Once you determine the structure to be safe and sound, you can begin installing the new metal roof. This can be done in a few ways, including installing the metal roof on top of the existing asphalt shingle roof. If choosing this option, it is important to note that one layer of shingles weighs from 2.4 to 3.2 pounds/square foot. If there are two layers there, it will weigh anywhere from 5.0 to 6.0 pounds/square foot. In most instances, a structure can only withstand a maximum weight of 10 pounds per square foot so you should be good to go as metal roofing is not very heavy. Although adding a metal roof will add dead weight of only 0.8 to 1.5 pounds per square foot, it is crucial that you figure the weight capacity before determining whether it is safe to install the roof on top of another. If weight allows and the under roof is in decent condition, you may be able to save on the cost of a tear-off.
However, if the existing shingles are rotting or deteriorating, it will be necessary to remove these shingles, to at the very least, make an assessment of the underlying structure to determine its safety. You may potentially save costs by doing spot repairs before installing the new roof in lieu of a complete tear off.
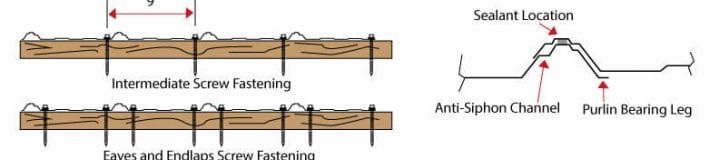
If you opt to put the metal roof atop current roof shingles, it needs to be done in combination with a synthetic underlayment (recommended). This should then be followed up with galvanized steel hat channel (preferred method) or 1” x 2” furring strips. Screw fasten the purlins using fasteners directly screwed into the trusses or rafters. Choose your screw size based upon the thickness of the decking material. For example, if working with a thickness of 1 ½”, #9 screws are adequate but when attaching the panels to either plywood or OSB, you will need larger, #14 screws. In installation, be sure to space the purlins no more than 24” horizontally. And, when reroofing, the valleys must be filled in at least 12” from the center.
NOTES:
- Furring strips must be designed to provide adequate uplift resistance.
- Ridges require 2″ or longer screws to attach through the flashing and high rib.
Should you first remove the shingles, you will still need to install the underlayment or 30 pound felt. Another option for installing a metal roof over shingles requires first laying a vapor barrier pound felt followed by the Grandrib 3 panels. However, if using this method, you’ll need to be sure to work with fasteners that are long enough to reach through the plywood or OSB, while also being careful not to overdrive the fasteners as this can cause a problem with the panels. Finally, when you do not completely remove the roof and attach the panels to roofing shingles, imperfections such as waves and dips in the metal will be more clearly visible because of the need to fasten them tightly to the existing shingles.
More Information: See How to Install Metal Roofing Fasteners
If desired, you can also place the underlayment right over the old shingles or purlins to act as an added barrier from moisture and the elements. When installing, you’ll also want to consider these other tips:
- In extremely hot temperatures, the asphalt may bleed causing residue to be on the worker’s shoes and potentially on the new roof. This problem can be alleviated however with the use of synthetic underlayment.
- For added protection against ice and other elements, install ice and water shields along the eaves in valleys or where there is the possibility of cold weather. See Condensation and Ice Damming on a Metal Roof.
- The standard 30 pound felt will not work when used under a standing seam roof. In this case you will need to lay a slip sheet of red rosin paper before laying the felt.
- You can also choose to install the metal roof over a Titanium underlayment. This underlayment is a suitable barrier; however the appearance of the metal roof can adversely be affected as it is difficult to use fasteners with this product. Consequently, Fabral discourages using this method.
Many panels are made to go over a solid substrate, this includes Climaguard, Horizon 16, Ultra-loc and 5-v Crimp. This solid substrate is needed whether you are re-roofing or working from a clean deck. If re-roofing, you have two options. First, you can pull back the shingles to get to the existing substrate, which is a costly effort. Consequently, the most feasible option might be to use fiber board to fill open spaces between the purlins. This process is less time consuming and thus less costly. However, rigid insulation such as fiber board should not be used on the entire roof or as a material on which to fasten roofing materials.
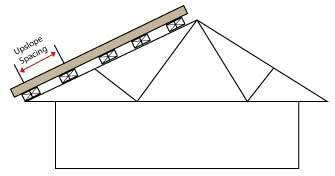
Metal panels are to be screwed directly into the purlins. Use your judgment to determine spacing per your geographic location, weather conditions and of course your local building codes. Other issues such as the roof height and slope should also be considered. Additional screws and fasteners should be installed around eaves, ridges, hips and gables as they are more susceptible to wind uplift. Finally, it is suggested to use sealing sidelaps as well as endlaps with butyl or butyls sealing tape to ensure a strong weather seal. And for added warmth, noise reduction and protection against condensation, you can install additional insulation in the spaces between your 2” x 4”s. This insulation should meet the standards for proper thickness, R-value and provide a good vapor barrier while not being too thick or bulky as that can cause the metal roof to fit improperly.
If looking for a roof with a longer life span, aluminum is your best option. It is also resistant against problems like acid rain and corrosion. And finally, it is the only roofing material that was able to stand up against salt water exposure in an ocean environment. Some good choices for aluminum roofing include the Grandrib 3, Grandrib 3 Plus, Alutuff or Alutuff II metal panels. Standing seam metal roofs will also work but do not fit most household budgets.
 Typical Wind Speeds and Load Ranges
 Typical Wind Speeds and Load Ranges
- 80 MPH – 14.7 to 21.3 PSF
- 90 MPH – 18.7 to 27 PSF
- 100 MPH – 23 to 33.3 PSF
- 110 MPH – 27.9 to 40.3 PSF
- 120 MPH – 33.2 to 48 PSF
PSF = Pounds per Square Foot
Load Spans for 29 Gauge Grand Rib 3
| Substrate | Fastener | 9 inch | 12 inch | 15 inch | 18 inch | 21 inch | 24 inch |
| 3/4″ plywood | #9 x 1″ Woodfast | NR | NR | NR | NR | NR | NR |
| 3/4″ plywood | #14 x 1″ MP | 275.6 | 206.7 | 165.4 | 137.8 | 118.1 | 103.4 |
| 5/8″ plywood | #9 x 1″ Woodfast | NR | NR | NR | NR | NR | NR |
| 5/8″ plywood | #14 x 1″ MP | 160 | 120 | 96 | 80 | 68.6 | 60 |
| 1/2″ plywood | #9 x 1″ Woodfast | NR | NR | NR | NR | NR | NR |
| 1/2″ plywood | #14 x 1″ MP | 135.9 | 101.9 | 81.5 | 67.9 | 58.2 | 51.0 |
| 23/32″ OSB | #9 x 1″ Woodfast | NR | NR | NR | NR | NR | NR |
| 23/32″ OSB | #14 x 1″ MP | 115.9 | 86.9 | 69.5 | 57.9 | 49.7 | 43.5 |
| 19/32″ OSB | #9 x 1″ Woodfast | NR | NR | NR | NR | NR | NR |
| 19/32″ OSB | #14 x 1″ MP | 100.7 | 75.5 | 60.4 | 50.3 | 43.1 | 37.8 |
| 7/16″ OSB | #9 x 1″ Woodfast | NR | NR | NR | NR | NR | NR |
| 7/16″ OSB | #14 x 1″ MP | 61.5 | 46.1 | 36.9 | 30.7 | 26.3 | 23.1 |
| Solid 2x SPF | #9 x 1″ Woodfast | 218.7 | 164.0 | 131.2 | 109.3 | 93.7 | 82.0 |
| Solid 2x SPF | #14 x 1″ MP | 293.3 | 220.0 | 176.0 | 146.7 | 125.7 | 110.0 |
| Solid 1x Pine | #9 x 1″ Woodfast | 168.4 | 126.3 | 101.0 | 84.2 | 72.2 | 63.2 |
| Solid 1x Pine | #14 x 1″ MP | 207.1 | 155.3 | 124.2 | 103.5 | 88.7 | 77.7 |
| Screws per Square | 190 | 150 | 120 | 100 | 90 | 80 |
Please call us toll-free at 1-877-833-3237
with any questions or quote needs! We are here to help.
Customer service and pricing available from 8:00 am to 5:00 pm MST Monday – Friday.
Just want online pricing? Click here to get instant online pricing.


